Blog
How to Assemble Ford Bronco Raptor 24V 2-Seater Ride-On Truck
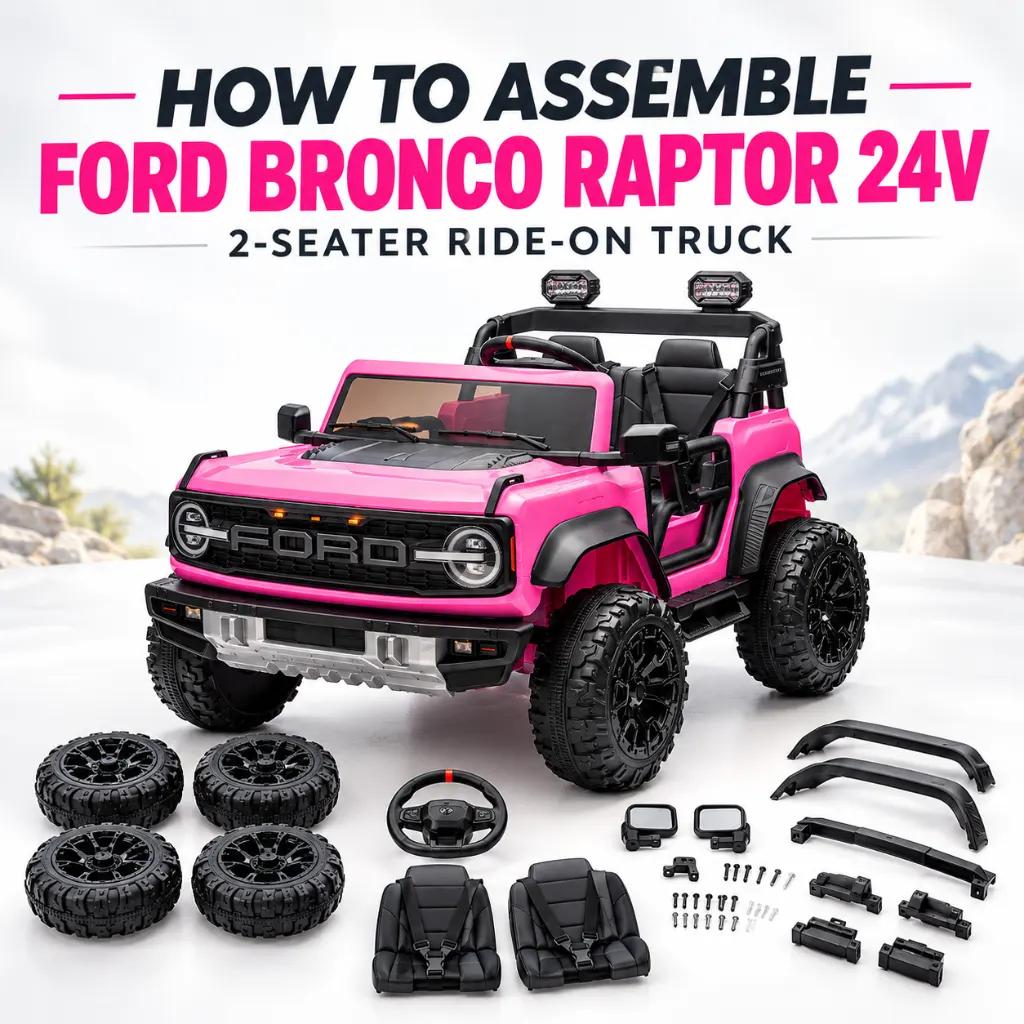
When you buy an electric ride-on toy, are you still worried that the assembly will be complicated? No worry, In this guide, we’ll use the Ford Bronco Raptor 24V 2-seater ride-on truck model as an example and walk you through the assembly process step by step. The entire installation process takes only 30–45 minutes! No drilling, no wiring, no mechanic skills – just a few screws, four wheels, one steering wheel, and a parental remote to pair. Below is the exact order we recommend, written so any parent can get the kids driving the same afternoon. For more ride on toys and the full licensed lineup, you are in the right place.
What's in the box (and what you'll need)
First, clear a flat workspace and keep little ones away while you build – it is clear that this is adult assembly, and small parts stay out of kid reach until the truck is done. Inside you'll find the one-piece truck body with the licensed Ford Bronco Raptor shell molded on, two bucket seats with 3-point belts, the steering wheel and dashboard, four all-terrain wheels, front and rear fenders, a wind deflector, two rear-view mirrors, the 2.4G parental remote, the 24V rechargeable battery with its wall charger, and a hardware bag of self-tapping screws in a few sizes. The only tool you need is the included screwdriver – no power tools required.
Step 1 – Connect the 24V battery (do this first)
Before installation, open the charging-hole cover on the body and connect the two battery terminals together. Then close the cover. A 24v ride on car won't budge until these terminals are seated, so don't rush past it.

Step 2 – Flip the body and build the rear axle
Flip the truck body upside down on a soft blanket so you don't mark the shell. Settle the rear axle assembly – motor gearbox, red coil-over shocks, and rear cross beam – into the body mounts, then slide the long axle bar through the gearbox hubs. Tighten every bolt with the hex key: hand-snug first, then a final turn on each. Unlike a lot of power wheel cars that arrive as one molded tub, this Bronco Raptor gives your kid a real suspended axle, and that's why the grass-and-gravel ride feels so planted.
Step 3 – Press on and lock the rear wheels
Press each rear wheel firmly onto its hub, then snap the black hub cap over it. A 24v ride on toy this size puts real torque through those hubs, and a loose wheel is the fastest way to cut a first ride short – give each one a wiggle to confirm it's locked.

Step 4 – Build and mount the front suspension
Lay the front suspension beam flat on the floor and click the coil shocks into their seats, then lift the whole assembly onto the front mounts of the still-upside-down body and bolt it down. The Ford Bronco Raptor ride on truck is almost standing on its own four corners now.
Step 5 – Press on and lock the front wheels
Press the front wheels onto their hubs the same way, lock each with the white retainer, and snap on the hub caps. Flip the truck right-side up – it finally looks like a truck again.


Step 6 – Fit the lower guard plate
Screw the black lower guard plate across the front of the chassis with the included screwdriver. It hides the wiring up front and takes the knocks from curbs and rocks so the body doesn't have to. Eight screws, done in a minute.

Step 7 – Load the steering wheel, then mount it
Here's the step most people miss: the steering wheel runs on its own batteries. Unscrew the center cover counterclockwise, drop in two AA batteries, and screw the cover back on. Then slide the wheel onto the steering column and seat it into the dash until it clicks. That's the wheel your kid will white-knuckle on every run.

Step 8 – Add the wind deflector
Slot the wind deflector into the dash following the arrow. The wiper-style brow gives the cab that real Raptor face and keeps a little sun off the drivers.

Step 9 – Drop in the seats and harnesses
Drop the seat cushion into the body and fix it, then stand the backrests in their slots and secure them. Thread the two harness sets through their anchors so each side of the cab gets its own belt. Two seats, two harnesses – this is the part that makes it a true two-up ride.

Step 10 – Install tail frame and fender
Stand the tail frame into its slots at the back of the cab, then fit the rear bracket support to it. Now snap all four fender flares over the wheel arches – pressing each one firmly into its clips. None of the fenders need screws; they click into place. This is the stretch of the build where the truck goes from “assembled” to “awesome.”
Step 11 – Mirrors
Press the two rear-view mirrors into their grooves at the A-pillars and lock each with a couple of screws. Mirror check – the truck now reads exactly like the full-size Raptor.

Step 12 – Load the remote and pair it (the actual last step)
Open the remote's battery cover with the screwdriver and drop in two AAA 1.5V batteries, matching + and -. Switch the truck to remote mode and pair it – the “S” button cycles speed (one light = low, two = mid, three = high) and “P” is an instant stop. In remote mode the grown-up is in charge and the driver can't override, exactly what you want for a first two seater remote control ride on car.

For a more detailed installation video, click here to watch.
Before the first ride – charge it right
Plug the wall charger straight into a wall outlet – no extension cords. A full first charge takes up to 12 hours and never more than 20. Charge as an adult only, and never let a child ride or sit on the truck while it's charging. A topped-up 24v ride on car battery gives roughly 50 minutes to 2 hours of run time depending on speed and terrain.

Final safety check, then let's ride
Tighten every screw one last time, walk the truck through all three speeds on low, and tug each harness tight. Because the fun only counts if it's safe, this battery powered toys for kids from First Ride On is built to CPSIA and ASTM F963, with an anti-tip frame and a parental remote you can grab in a thumb. Best for riders about 3-8, two per seat, always with an adult watching.
Meet the Ford Bronco Raptor 24V 2-Seater
Ready to put it all together? The Ford Bronco Raptor electric ride on truck is our officially licensed Ford build with a true 21-inch dual cockpit, two 3-point belts, and a 24V dual-drive system that pulls grass, gravel and gentle hills. Three speeds (2.0 / 2.7 / 4.3 mph), Bluetooth, FM radio and a music board, bright LED headlights, and a 2.4G remote with a 98-foot range. If you've been shopping power wheels for big kids, this is the licensed upgrade; if you want the fastest power wheels style thrill in our 24V line without leaving little hands over their heads, the Bronco Raptor delivers. It's also a standout 24 volt ride on toy for siblings who'd rather ride together than take turns.
Grab yours and let's ride – First Ride On ships free across all 50 states with a 3-month full and 6-month parts warranty. Love at first ride!
FAQ
How long does it take to assemble the Ford Bronco Raptor 24V truck?
About 30–45 minutes for one adult. Every tool you need ships in the box, and there is no drilling or wiring involved.
What tools do I need to assemble it?
Just the screwdriver included in the hardware bag. No power tools and no drilling are required.
Do I charge the battery before the first ride?
Yes. Plug the wall charger directly into a wall outlet, not an extension cord, and charge for up to 12 hours, never more than 20 hours. An adult should handle charging, and children should never ride while the vehicle is charging.
What age is the 2-seater Bronco Raptor for?
It is designed for children roughly 3–8 years old, with seating for two riders. Parents can use the parental remote to assist younger or less experienced drivers.
What should I do if the remote will not pair?
Put the truck in remote-control mode and follow the pairing instructions provided with the vehicle. Check that the two AAA batteries are installed with the correct polarity. If your remote has a P or stop button, use it to stop the vehicle when needed.
Can more than two kids ride at once?
No. The manual limits the vehicle to two riders. Always supervise children and use the truck on flat, hard ground away from streets, water, and steep slopes.